Hubspot
How to track Hubspot form submissions and offline conversions in Anytrack
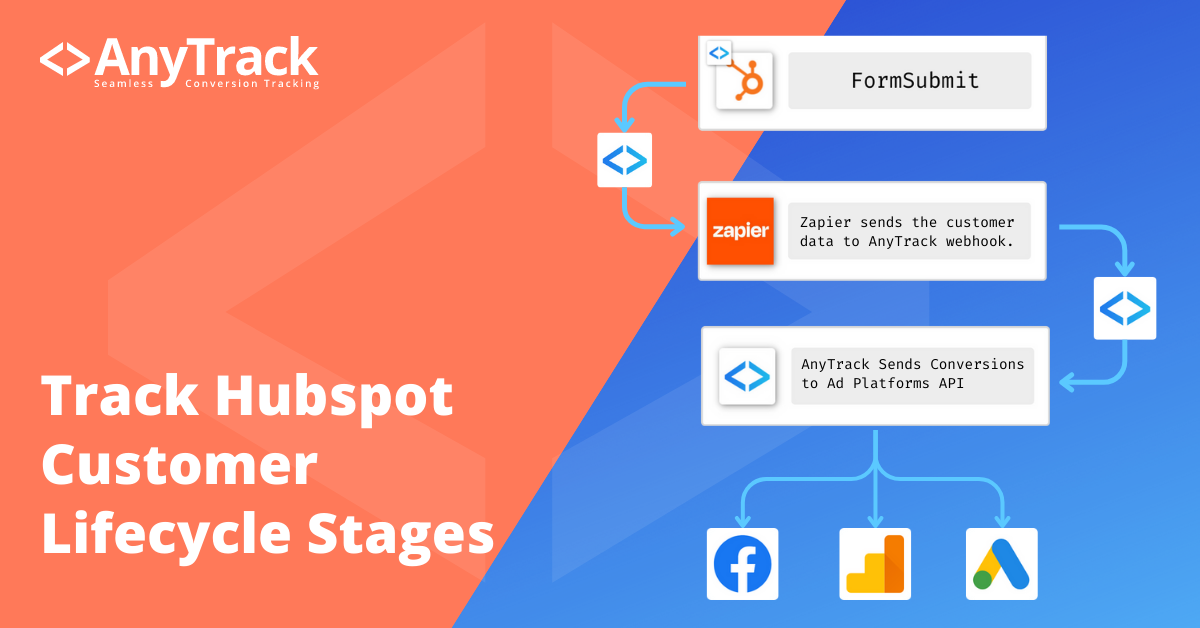
Experience the cutting-edge integration of HubSpot and AnyTrack. With this synergy, customer Lifecycle Stages are seamlessly sent to AnyTrack. This allows you to accurately track and attribute your customer's journey through all lifecycle stages, especially when dealing with long sales cycles or offline conversions.
Warning:
While this guide does not require any coding skills, you must be familiar with the tools that we're using. Google Tag Manager, Zapier and Hubspot. If you're not familiar with these tools, please ask a developer to assist you.
This integration provides a more robust understanding of your customer data, enabling advanced and precise tracking of conversion events.
Marketing & Sales Objective
In a nutshell, let's say you are running ads on Facebook for your coaching business, you will want to tell Facebook when visitors move through each of the standard Customer LIfecycle stages and each of the meaningful engagement Events.
Below is a non exhaustive list of touch points and goals you will be able to track:
- Track Offline Conversions
- Customer lifecycle
- Deals
- Custom conversions
- Enrich Ad platforms Pixels and Conversion API with granular Event Attributes for Enhanced Custom Audiences.
- Track and attribute Long sales cycle.
- Track Contact Engagements (meeting booked, conversations, tickets, deals, lifecycle stages or Custom Behavioral Events).
- High ticket sales closed over the phone.
⚠️Tracking challenge and solution
In order to tie Web Events with CRM Events (offline conversions) AnyTrack must attach a unique and anonymous identifier to the Contact and
Since the Hubspot native forms are generated using a Javascript Anytrack is unable to AutoTag the form with the click_id.
Solution: To overcome this feature we will be using the external_id method and tie one of Hubspot identifiers with the AnyTrack first party data.
External_idparameter to alias the hubspot id with anytrack id.- Custom integration via Zapier > Hubspot > Webhook Automation.
Requirements:
- A Hubspot CRM account
- Native Hubspot form + Hubspot tracking tag on your landing page.
- A Zapier account.
- A Google Tag Manager account.
- AnyTrack account with Personal or Advanced plan.
How it works
- Trigger: when the form is submitted.
- Find: We search the contact in Hubspot to retrieve the complete contact details.
- Action: Post the Conversion Event to the AnyTrack Webhook.
 →
→
 →
→

Track Hubspot Leads in AnyTrack
Anytime a new form submission is created in HubSpot, find contact in HubSpot and send a POST request to AnyTrack via Webhooks by Zapier.
Install the AutomationStep by step guide:
- In Google Tag Manager: Install the Google Tag Manager Template
- Navigate to the variable screen
- Update the variable: AnyTrack property ID with yours.
- Update the variable Hubspot id with your hubspot portal ID
- Save and publish the container.
- In Hubspot: Create a new contact property by the name:
refid - In AnyTrack:
- Go to the integration Catalog and search for "custom"
- Click on Install to create the integration.
- Fill the name and URL (url should be set to
hubspot.com) - fill the parameters with "dummy data"
- Copy the Webhook URL
Open a new browser tab and sign in to your Zapier account
- Click on Install the Zapier Automation.
Zap setup + Testing
The Template Includes the the trigger and actions. However, you will need to select the Form you want to track and add the
refidproperty in the fields to be retrieved (see tutorial).You must test the trigger and each action in order to validate the integration.
- Follow the Zap instructions.
- Paste your AnyTrack webhook URL ⚠️ Strip the url parameters from the webhook (including the "?").
- Update the form fields if there are specific fields you need to pass to AnyTrack, or leave empty to track all standard parameters passed from Hubspot to Zapier
- Test, Save and Publish your zap!
Track contact lifecycle updates
- Create a new Zap
- Trigger: Select Hubspot
- Event: Select the New Contact Property Change
- Select the Property Life Cycle Stage
- ⚠️ In Additional properties to retrieve Add the
refidproperty - Action - Add the AnyTrack webhook (same as previous instructions
- Test, Save and publish your zap.
Good to know:
You can trigger events from Hubspot for different actions or types of actions.
- Deal Stages
- Contact Lifecycle Stages
- Contact entering a list
- Contact Engagements such as meeting booked, or tickets, or conversations
Anytrack can ingest any of these Events, but it's up to you to decide how you want to trigger them.
Keep in mind:
Only contacts that have been previously tagged by AnyTrack will be tracked.
FAQ & Troubleshooting
-
Are you seeing errors in the Event Log?
- Check that you've set to retrieve the
refidproperty in the zap Find step. - Check that you've published the GTM container
- Check that you've updated both Anytrack property id and hubspot portal id variables.
- Check that you've set to retrieve the
-
How do i trigger a different conversion event?
Add the
?event_name=YOUR_CONVERSION_NAMEto the webhook URL. -
How do I track more contact properties from Hubspot?
In the find contact step, add the properties you want to retrieve.
-
Can I use the AnyTrack webhook in Hubspot workflow?
Yes, but you'll have to map the hubspot properties to the AnyTrack default Event Attributes.
Logos provided by Brandfetch
Updated 2 months ago