Checklist for Accurate Conversion Tracking
AnyTrack ensures control over your setup, offers deep data understanding, smooth operation, and accurate conversion tracking and attribution.
Since AnyTrack's inception, we've crafted a process for full control of your setup. It ensures seamless working with tools like Facebook Event Manager, or using dummy conversions for real scenarios, offering deeper data understanding. Once live, all runs smoothly, capturing accurate data, empowering you with confidence to thrive and scale your marketing with confidence.
Remember
Conversions have to be tracked in AnyTrack before they can be sent to your Ads Integrations.
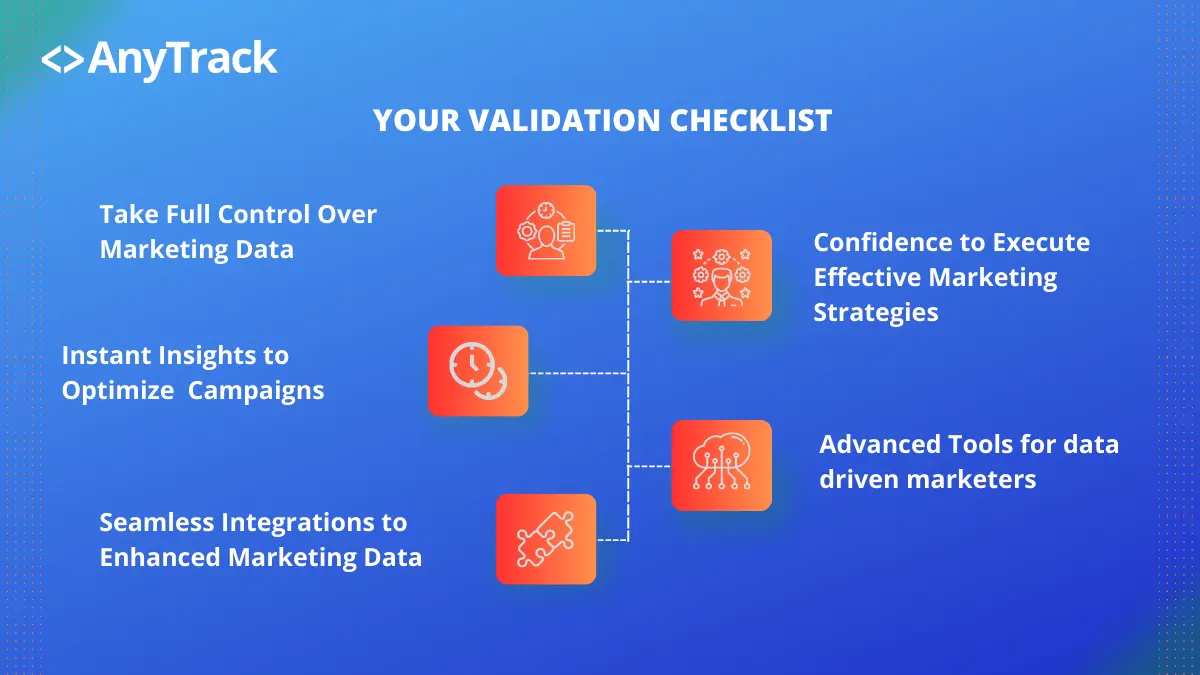
How you benefit from this checklist?
Beside the obvious fact that you'll get accurate tracking you will also get:
-
Full Control Over Marketing Tracking: By giving you complete control over your AnyTrack setup, the process ensures that you can tailor your tracking in alignment with your marketing strategies, allowing for more effective marketing decisions.
-
Insights to Optimize Marketing Campaigns: The process, including real-world scenario simulations, provides a deeper understanding of your data. This empowers you to gain insights that can be leveraged to optimize your eCommerce marketing campaigns, leading to better ROI.
-
Seamless Integration for Enhanced Marketing Data: The guarantee of smooth operations and accurate tracking across all platforms means you can trust your data, enabling you to make more informed and precise marketing decisions. The integrated approach fosters a unified view of all your marketing efforts.
-
Confidence to Execute Effective Marketing Strategies: Engaging actively with each aspect of your tracking setup builds the confidence and knowledge necessary to execute and thrive in your eCommerce marketing efforts. Understanding the intricacies of tracking means you're well-equipped to implement and adapt marketing strategies that work.
The AnyTrack Checklist!
-
Set Up your Property:
- Navigate to the properties section and create a new property.
- Set name and URL and add the tracking code on your website or platform.
- Adjust the localization settings - currency, timezone. Both affect reporting.
-
Integrate with Advertising Platforms:
- Connect AnyTrack with your advertising platforms like Facebook, Google Ads, etc.
- Make sure to enable the Conversion API for accurate tracking and attribution.
- Grab the recommended The UTM Tracking template and add it to your ads, under the tracking parameter fields (
 do not add the utm parameters to your final url).
- Google Ads - Tracking URL settings -> tracking template.
- Facebook Ads - URL Parameters.
- Verify your ads settings: ex: Tracking pixel > Facebook > Ads integration
- Remove Tracking pixels from your website to avoid duplicate attribution data. Ex: if you are connecting anytrack with facebook, then remove the facebook pixel and any other remnants facebook event tags, or apps that might be interacting with the facebook pixel.
- Ads integrations provide diagnostics tools such as the Facebook Event Manager, that should be used to verify your settings.
-
Connect with your Conversion Sources: AnyTrack provides no-code integrations with over 100 platforms such as Shopify, ClickFunnels or Typeform. Visit the integration catalog.
- Follow the step by step instructions - each integration has different requirements, so pay attention to the steps.
- Adjust the Conversion Mapping to your liking. Optional but recommended if you know what you doing.
- All integrations have been rigorously tested before release. But changes can happen and we don't always get the heads up.
-
Set Up Google Analytics (GA4): - Optional but powerful if you want to see real time data flowing from AnyTrack.
- Connect AnyTrack with Google Analytics to view and analyze your data without switching tools.
- Ensure the Measurement Protocol is enabled GA4 for enhanced features.
-
Customize Campaign Reports:
- Adjust your reporting to reflect the data you want to see.
-
Configure Audience Building:
- Use first and zero party data collection to build accurate audience segments in your ad platforms.
- Leverage event attributes to create granular audiences.
Test and Validate your Setup
Prerequisites:
- Make sure you don't have any ad blocker or any type of strict browser privacy settings on.
- For GA4 testing you have the Google Analytics debug extension.
- You've completed the recommended setup.
- Recommended: You are familiar with your browser Developer Mode.
- Go through your funnel as if you were a potential customer.
- Open the Conversion Event Report to inspect the customer journey and the events being triggered.
- Validate the data accuracy and make adjustments as needed.
Common missteps
Spot tracking errors with ease
- Confirm the removal of tracking tags from your website.
- Validate the correct conversion mapping.
- Ensure AutoTag works on your links and forms, and avoid using short URLs like Bitly.
- Check the event log and GA4 Debug view for a close look at your data.
- Validate Facebook Ads (or other ad platform) integration with only Conversion API events visible.
-
The AnyTrack Tracking Tag:
- Ensure that the AnyTrack tracking Tag is set on all pages of your website, funnel or platform.
- Use tools like browser developer mode to verify the tracking scripts' fires for the desired events.
-
Validate Ad Platforms Integration:
- Run a small test campaign on connected ad platforms like Facebook or Google Ads.
- Check if the Conversion API is receiving data. depending on the platform it can take some time - Facebook Event Manager is about 15-20 minutes.
- Facebook eCommerce Manager: Match rate should be over 95%. If not, then doublecheck that the catalog feed you are using is mapping the variantid with the catalog id.
-
Verify Conversion Source Integrations:
Integration Validation:
- The integration will remain unvalidated until you receive a valid conversion.
- Errors are common if you just installed the integration and you had traffic that wasn't tracked by anytrack in the first place that triggers late conversions.
- If possible, perform test transactions and inspect the integration Event Log for possible errors.
- Validate if AutoTag is working as expected on your links, forms so that server side tracking from your integration can be tracked.
-
Verify Affiliate Tracking integrations
- Check that your offer links are being AutoTagged (hover on the links to see if the
subid=as0d98fis generated. Learn about Autotag. - Check your affiliate reports subid tracking and make sure subid values are populating.
- Consult the integration's knowledge base article includes a FAQ and troubleshooting section.
- Check that your offer links are being AutoTagged (hover on the links to see if the
-
Check the Ecommerce checkout flow (if applicable):
- Test product sales tracking, cart abandonment, and other eCommerce-specific events.
- Verify the proper attribution of sales and conversions within AnyTrack.
- Verify in GA4 the variant id, item id, product and variant name.
-
Check Google Analytics Integration:
- Verify the integration with Google Analytics, especially GA4, by observing real-time data and the debug mode. Learn how to validate Google Analytics 4.
- Confirm if custom events, audiences, and other configurations are reflected correctly in your GA4 reports.
-
Monitor Audience Building:
You need to create your custom audiences first. - Test the audience segmentation and targeting by running a mini-campaign or using a sample data set.
- Ensure that the first and zero party data collection is working as intended.
-
Check the Reporting:
- Verify if the reports reflect the events and parameters you expect and adjust the columns so that you see the events and metrics you need.
- Learn how to read the reports so you can spot issues like duplicate data.
Date selection
Make sure you select the correct dates when you validate as AnyTrack will only display data that was collected from the moment you connected your website and conversion sources.
Spotting errors? Something does show as expected?
Once you went through the checklist and still get errors, contact the support and raise a ticket with as much details as possible.
Avoid the following messages:
- Tracking is wrong. Can we do a zoom?
- Attribution doesn't work. Can you please login to my account and fix it?
- I don't see any conversions, why?
You will be waiting between 2 and 10 hours during normal office hours before getting a preformatted response asking for more details such as:
- Which property?
- Which integration?
- Did you go through the checklist?
- can you elaborate on what exactly you are experiencing?
We're here to help and the best help we can offer starts by precisely identifying the issue you are experiencing. So the sooner we identify the issue, the faster you'll get resolution.
- If you encounter any issues please go through the setup checklist and double-check you've followed the instructions displayed on the anytrack dashboard.
- If you integrated with a custom eCommerce platform, please ensure your developer has access to the platform and the documentation.
By following this comprehensive testing and validation process, your can ensure that your AnyTrack setup is working seamlessly. These steps might include creating dummy conversions to mimic real-world scenarios. It ensures that once the setup goes live, everything runs smoothly, and accurate tracking and attribution data are captured from all integrated platforms and tools.
Updated 5 months ago